Viewing and editing document properties
Properties of SharePoint subsites and document libraries cannot be shown in the Properties window.

How to open the Properties window
- Locate and select the items in the sidebar.
- Right-click and select View Properties, or press Alt+Enter.
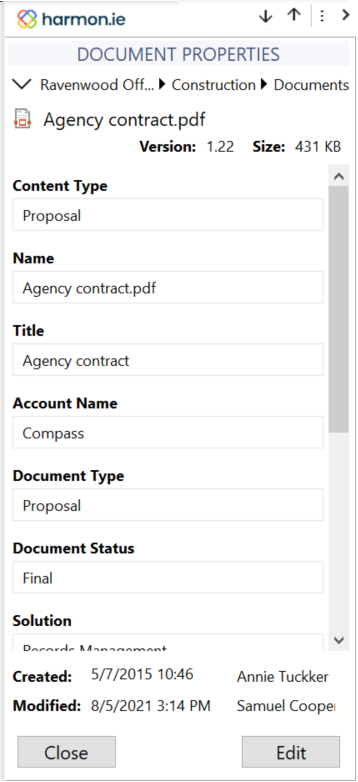
- The Properties window opens:
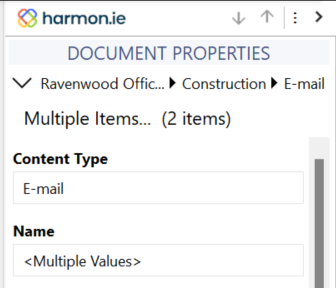
- The header shows the item name. If multiple items are selected, the header says Multiple Items… (x items). Hover over this text to view the names of the selected items.

- If an administrator defined Retention Labels in the SharePoint location, the retention label applied to the documents is displayed at the top.
- The properties are listed by their SharePoint order. Each property name is followed by its value.
- The value <Multiple Values> indicates that this property has different values in the selected items.
- People and groups added using the Person or Group dialog are displayed in the Properties window as defined in SharePoint. For example, you can configure the column in SharePoint to show the selected person’s or group’s email address, instead of name.
- The people who Created, Modified, and (optionally) Checked Out the document, along with the creation and modification times, are listed at the bottom of the Properties window.
- The header shows the item name. If multiple items are selected, the header says Multiple Items… (x items). Hover over this text to view the names of the selected items.
The Properties window opens automatically after uploading documents to SharePoint in these cases:
- The document library is configured with required properties that do not have a default value.
- Column validation is defined and the validation fails.
- The Properties window is configured to be opened on every upload.
How to view the properties of the next/prev item
When the Properties window is open for viewing, there are up & down arrows at the top of the harmon.ie sidebar.
Click the Previous Item icon () to view the properties of the previous folder/document, or the Next Item icon (
) to view the properties of the next folder/document.
To open the Properties window for editing
- Locate and select the items in the sidebar.
- Right-click and select Edit Properties. If the library requires check out, the items are automatically checked out.
– or –
- Locate and select the items in the sidebar.
- Right-click and select View Properties, or press Alt+Enter.
- Click Edit. If the library requires check out, the items are automatically checked out.
How to edit properties
- Open the property window for editing. (The window is automatically opened when saving emails or documents to a location with required properties.)
- You can filter the properties window to Show properties that require attention (
), that is, required properties that are empty, or to Show all properties (
).
- To edit property values:
- If Retention Labels are set, you can select a Retention label for the current documents from the Retention Label drop-down list.
- Click the value box of simple property types, such as Single line of text, Number, Date and Time, and Currency, to edit their value inline.
- For properties of types Choice, Yes/No, and Date and Time, and for Content Types, click the down arrow to select a value.
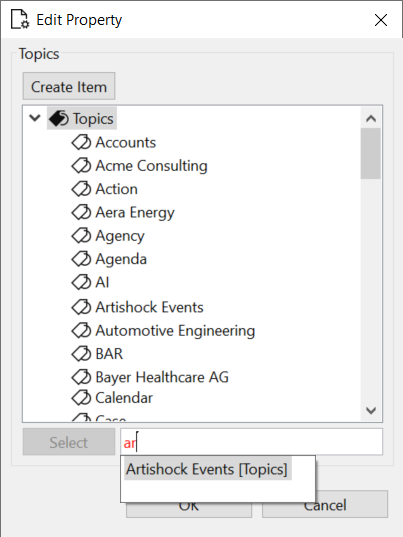
- For more advanced property types, such as Multiple lines of text, Person or Group, Lookup, or Managed Metadata, click the ellipsis (…) next to the property value to open a dialog from which you can edit the value.
- When editing multiple-selection Choice columns, start typing a value name to filter the list by that name.
- You can simultaneously edit the property value of multiple documents. You will be notified if editing the property value failed for any of the documents (for example if one of the documents is checked out to another user and cannot be edited).
- Required properties are indicated with a red dot (
 ). If the value of a required property is empty, you will not be able to check in the document and it will not be available to other users.
- Click Save to save your changes to SharePoint.
- If the document was checked out, you are prompted to check it in now.
To edit managed metadata properties
- Look for the required property in the list, or start typing the first letter of the term for easy location.
- Click the term and then click Select.
- Click OK when done.
- Hover over a term to view its description, if such is defined.
- If synonyms are defined for a term, you can search for the synonym. Note that when you select a synonym, the base term is assigned with the property.

To change the content type
If the library defines more than one content type, the first listed property in the Properties window is Content Type. By selecting a different content type, you also change the list of document properties. To learn more about SharePoint content types, read Introduction to content types and content type publishing.
